As I explained in my
last post (Getting ready for Vista), the MSI file generated by a Visual Studio 2005 setup project contains a few errors which prevent it from passing the Vista logo tests.
The only solution I am aware of is to patch the MSI file using the
Orca tool from Microsoft.

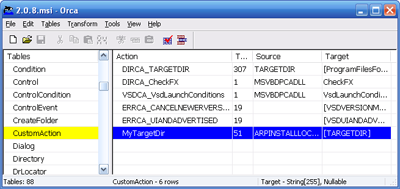
This tool allows you to peek inside an MSI file and edit its tables. Basically, an MSI file is a database which is used by the Microsoft Installer in order to install, repair and uninstall an application. All the information is stored in a collection of about 90 tables. The left hand side of Orca lists the available tables and the right hand side the rows of the selected table:

I used Orca to apply the following modifications to the MSI file:
- In table AdvtExecuteSequence, drop the only row which has a GUID and a condition set to UpgradeCode.
- In table CustomAction, add this row: MyTargetDir, 51, ARPINSTALLLOCATION, [TARGETDIR].
- In table InstallExecuteSequence, add this row: MyTargetDir, , 798.
- In table InstallUISequence, fix row ERRCA_UIANDADVERTISED by setting its Sequence value to 2.
For me, this fixed all errors and warnings spotted by Orca. However, there is still a missing dialog in the MSI file, which would make the test
case 25 fail (
Verify the application properly handles files in use during install, req: 2.12). Fortunately, I found a solution in the Microsoft forums.
Derek Sanderson's post was very helpful.
The test case 18, as specified in the December 2006 version of the test document, is broken. See the discussions
here: my MSI file contains two rows in the
Upgrade table, one with only a
VersionMin but no
VersionMax and another with both a
VersionMin and a
VersionMax. Per test case 18 (v1.1), this is not valid. However, it should be considered as correct, as confirmed by Oliver Lundt from Microsoft Global Partner Support and this requirement has been addressed in v1.2 of the test cases. I can confirm here that VeriTest is aware of this issue and will happily accept an MSI file which does not meet test case 18 (v1.1).
Applying all these changes manually would not be realistic, so fortunately, it is possible to automate the process. Before doing any modifications in Orca, use the
New Transform command which will record every modification in the MSI file. When you are done with your modifications, you can ask Orca to
Generate Transform, which will produce an
MST file.
Applying these transforms automatically after every build can be done in a post-build script file, using the Windows SDK tool
msitran:
msitran -a xyz.mst application.msi
Finally, the MSI file has to be signed using the standard
signcode procedure:
signcode -a sha1 -ky signature -spc opac.spc -t http://timestamp.verisign.com/scripts/timstamp.dll -v opac.pvk application.msi

